Sharing the Security: A Guide to Adding Backup Face ID on Your iPhone
Sharing the Security: A Guide to Adding Backup Face ID on Your iPhone - Face ID has revolutionized iPhone security, providing a convenient and secure way to unlock your device.
But what if you share your iPhone with a partner, family member, or trusted friend? While you might not want to share your personal Face ID, you can still grant them access by setting up a Backup Face ID.
This guide will walk you through the process, ensuring everyone has a secure and personalized unlocking experience.
Understanding the Benefits:
Adding a backup Face ID offers several advantages:
- Enhanced Security: By utilizing multiple Face IDs, you create an extra layer of protection against unauthorized access.
- Even if someone attempts to unlock your phone with their face, it won't be successful unless it matches one of the registered Face IDs.
- Convenience: No more struggling to unlock the phone in challenging situations, like when wearing gloves or a mask. By adding Face IDs for trusted individuals, you ensure seamless access when needed.
- Peace of Mind: Sharing your iPhone with loved ones becomes less of a security concern when they have their own Face ID for quick and secure access.
The Seamless Setup Process:
Adding a backup Face ID is surprisingly easy. Here's how to do it:
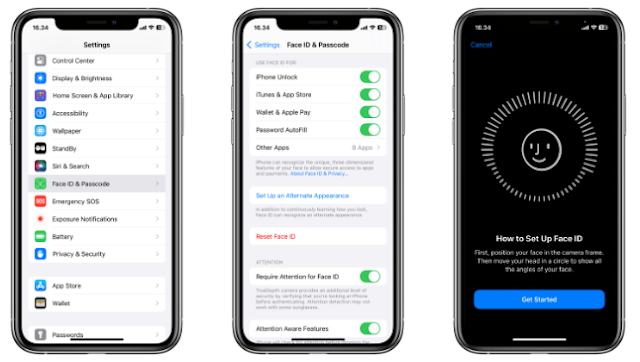
- Launch Settings: Locate the familiar gear icon on your iPhone's home screen and tap on it to access the Settings menu.
- Navigate to Security Settings: Scroll down the settings list and tap on "Face ID & Passcode." This section manages all settings related to Face ID and your passcode.
- Enter Your Passcode: If prompted, enter your existing passcode to grant access to the Face ID settings. This ensures only authorized individuals can add or modify Face ID configurations.
- Activate the Backup Feature: Locate the "Set Up an Alternate Appearance" option within the Face ID & Passcode section and tap on it. This initiates the process of adding a backup Face ID.
- Verify Your Identity: For security purposes, Face ID authentication might be required before proceeding. Simply position your face within the frame as instructed, and your current Face ID will unlock the settings.
Welcome the New User: Tap on the "Get Started" option to begin the setup process for the backup Face ID.
Follow the On-Screen Instructions: The iPhone will guide you through a series of steps, similar to the initial Face ID setup. These steps involve holding your face in various positions to capture different angles and ensure accurate recognition.
Completion and Confirmation: Once you've completed the steps, you'll see a message confirming "Face ID is Now Set Up." This indicates that the backup Face ID has been successfully added to your iPhone.
Additional Tips and Considerations:
Clarity is Key: Ensure the individual adding their Face ID is in a well-lit environment with a neutral background. This helps the camera capture their facial features accurately.
Multiple Backups: You can add up to five different Face IDs to your iPhone, providing access for multiple authorized users.
Removing Backups: If you no longer need a specific backup Face ID, you can easily remove it by following the same steps mentioned above, but instead of "Set Up an Alternate Appearance," select the Face ID you want to remove and tap "Delete."
Security First: It's crucial to only add Face IDs for individuals you trust completely. Remember, Face ID provides secure access to your iPhone, personal information, and applications.
By following these steps and understanding the benefits of adding backup Face IDs, you can enhance security and convenience on your iPhone while sharing access with trusted individuals. So, share the security and unlock a new level of convenience for everyone who uses your iPhone.


0 Response to " Sharing the Security: A Guide to Adding Backup Face ID on Your iPhone"
Post a Comment
Note: Only a member of this blog may post a comment.